
I hope you get what you want from this guide. Im genuinely interested in transferring my knowledge to further the cause of people taking and interest in the brilliant mechanics you discover in clocks. There are a few stars of the show and the 400 day anniversary clock is a masterpiece of innovation and precision engineering. Its a please to tell you how it works.

About this anniversary clock
This is the clock I will be working on for this tutorial. Its German made in about the 1950’s and quite accessible in terms of price at £50 to £100 for a decent one. One of the reasons they are so cheap is that the suspension springs need replacing after a few years and many break. They are not as popular as they might be and are seen as a bit “specialist” and too much for some people. I mean, its true really. You have to be into engineering a bit to want one and a bit adventurous to service one hence the rather unique appeal of these items.
I bought this on ebay with a broken spring. I actually bought it with a working spring but it was delivered broken and with parts missing. Dont buy clocks on ebay unless they are new. Im planning a sales section for the site so come back here and buy one from somebody who cares and wants you to be into owning one.
Anway Ill get on with it. Well the first part anyway – stripping down a 400 day anniversary clock and suspension spring assembly.
Having read my previous blog article (of course!) on repairing your own carriage clock you will have seen that was not for the feint hearted and niether is this – its pretty advanced for a beginner. I say advanced because repairing a broken anniversary clock is normally a matter of changing the suspension spring and this is FIDDLY.
However, conversely, none of the mechanics are not that difficult to understand once you see whats going on by taking it apart.
IMPORTANT: Please unwind your clock before working on it. It may hurt you with spinning cogs sawing into your skin, twisted fingers where the strength has taken you by surprise, or a thrown key coming at your eyes. Click this link if your clock is still wound to see how to unwind it https://braintreeclockrepairs.co.uk/2016/01/29/how-to-unwind-a-clock/
How a 400 day anniversary clock works
The clock works by hanging a weight on a flat thin wire that runs up the back of the clock (usually through a sleeve which is annoying) and attaches vie a lynch pin to a spigot that is there purely there as a hanger. You will see that on this wire there is a fork which forms its own bracket to hold itself in place. As the weights rotate the flat suspension wire flexes on its axis back and forth throug about a three quarter rotation. As this flexes the fork attached to the top of the spring is in turn rotated through about 20 degrees – its motion is a reduced arc mimic of the weights movement. Dont worry if you dont understand this yet, you will get it as you proceed through the replacement and see the components are fitted to each other.
Stripping Down \ Taking apart the 400 day anniversary clock
If youve skipped the first section to get to the instruction please follow this link to learn how to unwind your clock before you start unless you want to end up in hospital (genuinely).
While it would be tempting to just look at the pictures to understand what to do I would encourage you to keep reading as there are important fail avoidance tips to follow.
The clock has to come apart because you need to get the long thin suspension wire out to change it. Its the central component in the whole regulating system so you have to take everything off to change it.
Here’s a picture with all the bits you need to strip of the movement. When I first started clocking I found it difficult to understand instructions because I didnt know where they were going or the “end game”. When you are doing this sort of thing I think it really helps to have a picture of the end game so here you go!.
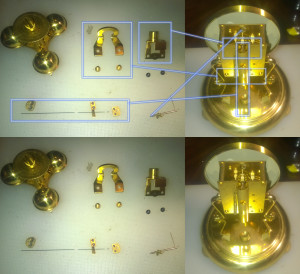
You can seen in the bottom left that we have the broken suspension wire and at its top and bottom, the sandwich clamps.
Dissasembly is very straight forward and a matter of removing the screws you can see in the blown apart view above. If your using this guide to take apart a working clock with an intact spring then remove the ball \ rotating weights by un-hanging them from the wire before you attempt to remove anything else. If you dont the thing will be under tension and when you take the top screws out the bracket can drop and snap the suspension spring.
To remove the weight it may be a case of lifting them off or you may find that there is a lnch pin to remove. If there is a lynch pin to remove then support the weights and get a firm hold on them as removing the pin can jar your hands and you can pull the weights \ snap the wire. The best idea is to slide some sort of soft cushion under them to support them – put as much under the weights as you need to in order to see the spring go loose tension and bend.
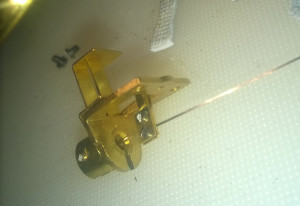
When I take the thing to bits I tend to remove the spring and its hanging bracket as one piece that I disassemble separately. This is a good idea because you will have to reassmble this set of bits later along with the replaced spring which you will then re-insert into the sleeve. Its worth payming attention to how this is fixed together with the lynch pin because when it goes back you may have to “encourage” some of the components together. Take particular notice of where the fork is mounted and measure it possible (noting down the measurement).
Once you have the parts spread out on the bench (placed in the order of removal of course) then you can get out the new suspension wire and start to prepare for the replacement. I got the following set of three on ebay. Make sure you get the right ones. Good vendors list the clock makes and models along side the various springs available. They are surprisingly cheap at under £10 for the set of three so you will only even have to spend the money once unless you are lucky enough to be young.
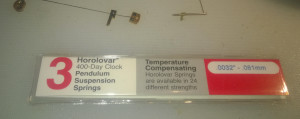
These springs are rediculously difficult to handle simply becuase they are so thin. Its hard to believe these suspension springs are springs at all and that the restance of them flexing is enough to rotate the movemnt back and forth.
The next bit is actually straight forward in terms of telling you what to do, You can see from the bits what needs to be unscrewed and attached and suchlike but…. its more about HOW you do it. Thats what I will deal with in the next blog post in a week or so.
Recent Comments